Once you’ve chosen the layout and material of the paver surface for your front or backyard walkway, installation is the next step. Depending on the extent of your paver design, the process while require a bit of preparation and effort, but the end result will be a stunning addition to the exterior of your home.
Proper preparation
Before we get to work, we’ll need to put a plan into place for your paver walkway. This entails mapping out the intended location of the pavers. It’s helpful to sketch out your plans on graph paper with the other major elements of your outdoor space (trees, sheds, your house, etc.). This will help us accurately calculate how the width and length of the walkway will fit within the dimensions of your property. Another important thing to do during the planning phase is contact your utility companies to make sure you won’t be installing anything that covers up any piping or cable lines.
Along with getting the OK from your utility companies, check your local building codes and homeowner’s association to make sure you abide by the restrictions and requirements in your area. With all your ducks in a row, calculate how many square feet of pavers you’ll need for your walkway and place your order. For a basic rectangular shaped surface, simply multiply the width by the length to find out how much square footage you’ll need to fill in. It’s also a good rule of thumb to add at least 5-10 percent to that figure, so that you have enough for cuts and spares.
Excavation and outlining
We’d ordered the materials, we have the necessary equipment on site and now we need to get the entire area outlined – time to get to work. Using either spray paint or stakes and string, outline the project area of your walkway. Next, begin removing the grass and soil from this area with your shovel or a spade. To estimate the exact depth necessary to lay down the pavers, add together the height of the base for the pavers (typically 8-12 inches), followed by an extra inch for sand bedding as well as the thickness of the pavers. Dig out this calculated depth, and once you’ve removed the grass and topsoil, make sure to compact the fresh surface.
“Base material helps keep pavers intact and maintains proper drainage.”
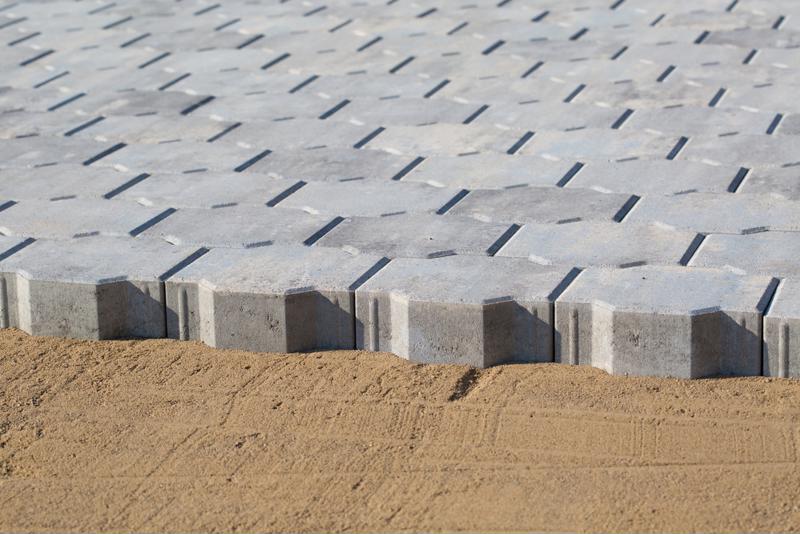
Spread the base
There are two primary functions to the base material for your pavers: to hold your pavers in place and assist in proper drainage. Usually, your base material consists of crushed gravel, with a hint of moisture in it that helps make compacting the various stones and rocks together much easier. Begin spreading out the crushed rock all around your outlined area, until it reaches your desired depth of between 4-6 inches. Spread the base material around evenly by using a rake, and then start compressing the rocks together with your plate compactor. Make sure your foundation is not only compact, but also has a slight, yet gradual slope to it to account for water drainage. Experts suggest that you should allow for at least a 1/4″ per foot drop and that you don’t exceed 1/2″ per foot drop.
Adding paver sand
Before we begin laying down paver stones or panels, we’ll have to apply a layer of bedding sand on top of your base foundation. This is to help ensure the pavers remain firmly intact as well as assist in preventing erosion from occurring. Before applying and leveling the bedding sand, plan out your route in terms of where you’ll be stepping during this procedure. This is because if you step onto an already leveled out area, you’ll need to rework it again. After you’ve poured the sand across the base material, use a 2-by-4 to drag over the layer and even it out. Remember, the depth of the bedding sand needs to be at least 1-1.5 inches thick.
Layering pavers
Now we’re ready to begin laying down the actual pavers. Start from the corner and lay down the stones or panels one by one, making sure you’re firmly placing them tightly within the sand and against the neighboring pavers. Never force them in or apply too much pressure, as this will disrupt the sand bedding and require further maintenance to fix. You might find that not all the pavers will fit into place, which will require you to use a masonry or diamond saw to cut off the appropriate amount to alter its size. Once all your paver stones or panels have been snuggly laid down, go over them with a plate compactor to settle them into the sand bedding below.
Sealing and maintenance
You’ve finally made it to the home stretch. Now all that needs to be done is a good cleaning and the application of a sealer – if it’s required for your chosen pavers. Different paver materials require different sealers so it’s always best to check your manufacturer recommendations or ask your local retailer.
Before applying the sealer, thoroughly clean the walkway and fill in the joints between the pavers with a fine sand. Next, put on the sealer by either spraying it on or by using a large paint brush or roller. Sealers help prevent staining, mold buildup, weed growth, and the effects of erosion. Re-seal the pavers every two to three years to maintain their appearance. Once everything is in place, all it takes is a little sweeping and light cleaning here and there to keep your paver pathway looking pristine.